
RV life can become boring as you sit in your vehicle without any plans for the day. It is for that reason that you may decide to install a TV in your camper or motorhome. But how to install a flat screen TV in an RV?
Achieving that project requires an understanding of the different types of TV mounts. Then, search for the ideal place to mount the TV. Finally, install the parts and the TV.
At first, it may seem like a fairly straightforward task. But missing out on a few details can lead to costly mistakes. You should keep reading to know the details about installing flat screen TV in RV.
Table of Contents
What You’ll Need
Take note that an RV TV installation project will not be complete without the necessary items. In this section, you will know the right materials and tools to complete the installation procedure for your TV in the RV.
Adjustable mount: You can use different TV wall mounts for RV, including tilt, articulating, and flat wall mounts.
The tilt mount is ideal for a relatively small space. You can place the TV near your sleeping or resting place with this RV flat screen TV mount. Tilt mounts also allow you to tip the TV vertically.
On the other hand, an articulating mount, also called a swivel or adjustable mount, is great for a large flat-screen model. This type of RV TV mount bracket can extend to different angles, and can also tilt in different directions.
Last, wall or fixed mounts generally do not have the flexibility or versatility of an articulating or tilting RV TV bracket. However, these options provide clean, built-in-looking looks for your RV TV.
Basic tools: Most RV TV mount locking kits on the market only come with brackets and some screws. You still need to have the necessary tools ready to install the TV in your RV.
Prepare tools like a stud finder, drill, and screwdriver. These pieces of equipment will help the installation procedure go smoother than average. That way, you do not have to spend most of the day installing your TV.
Thankfully, many TVs and mounting brackets already come with the included hardware like horizontal beams and the required cables for a proper installation.
Step-by-Step Instructions

At this point, you might be excited to watch your favorite movies or shows with your new TV in your RV. But do not let that excitement get into your head because you might make some costly mistakes.
Take the time to follow the steps below. Practice patience, and you can enjoy using your TV in your rig without worry for a long time.
Step 1: Find the Ideal Location
The first step to relatively every TV installation project is to find the perfect location for the device. Use the stud finder for this step.
A stud finder will check for screws or other objects hidden behind an RV wall.
To use the stud finder, start by identifying where the mounting bracket will go. Power up the stud finder and drag it along the surface of the wall where you want to place your TV for RV use.
If the stud finder beeps, mark the location with a pencil. You need to make pilot holes into studs for mounting.
Aside from using that tool, you also need to consider the right viewing angle. Take a look at the RV interior and its decor; then, ask yourself, do certain objects, such as a picture frame, mess with your viewing experience?
Also, avoid placing the device near areas with extreme temperatures, such as near the stove. Otherwise, the TV will be prone to malfunctions and can even be at risk of breaking.
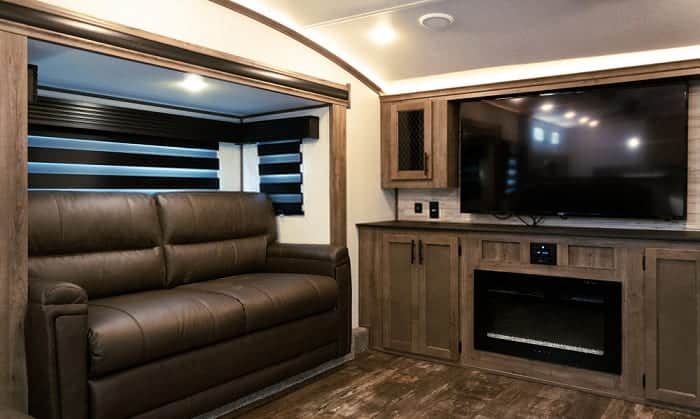
Step 2: Use the Old TV Closet
In some cases, RVs will already have TV boxes that can house these devices. If so, you only need to measure these receptacles, which means you can skip the entire stud-finding process.
If your RV already has this compartment, the vehicle’s manufacturer may pre-drill holes for your convenience. Otherwise, you still need to drill pilot holes into the closet for the TV mounting bracket.
Keep in mind that the current TV compartment might not fit certain flat screens. For instance, the TV cubby can only fit a smart TV of up to 24 inches, but you purchased a 32-inch model recently.
Furthermore, you should consider the size of the compartment if you have a TV box. If you have this device, make sure that the cabinet mount has enough space for the TV box. Otherwise, you may have to DIY an extra space for that product.
Step 3: Install the Mounting Brackets
Drill the holes on your RV’s wall. Then, follow your TV mounting bracket’s instructions on how to install the parts. If your wall bracket has a mounting plate, install the latter as well.
Take note that the installation instructions for the different types of TV mounts differ with each model. Therefore, it is best to consult the owner’s manual instead of ‘winging it’ to avoid making mistakes.
After mounting the bracket to the wall, double-check your work by checking its stability. Also, make sure that you bought a mount that can handle the weight of your TV.
Thankfully, many TV mount manufacturers make it painfully clear on their products’ labels and descriptions what TVs you can place on specific models. For example, if you have a 32-inch TV, search for a mount that can handle that model’s size and weight.
Do not attempt to buy and use a motion TV mount for a small TV if you have little space.
Step 4: Install the TV to the Mount
Now that you have your mount installed into the wall, it is time for the important part – placing the TV onto the mount.
Make sure to line the bracket to the back of the TV. At this point, it is best to have other people help you carry the TV while you secure it to the mounting bracket.
Depending on the dimensions and weight of your TV, this part can be quite strenuous. The people who are helping you should have enough strength to hold the TV for more than a few minutes if needed.
Connect the TV to the RV Power Supply
After securing the TV to the mount, connect the device’s power cord to your RV’s main power supply. In most cases, you only need to connect the TV to a wall outlet. However, this final step may differ for some setups.
Once the TV’s power LED light comes to life, power on the device to check for errors. Also, do a final check to see if the TV rattles or moves unnecessarily while staying on the mount. If it does, consider doing some final adjustments.
If you camp at an RV park. This is the article on How to Hook up Cable TV at RV Park that will help you have a great experience.
Optional: Add L Brackets
If you want additional security and stability for your RV TV, you can also add a couple of L brackets to the setup. But these optional parts tend to work best for a flush installation and may not be ideal for a TV attached to a tilting or articulating mount.
If so, screw the L brackets to the left and right borders of the cabinet around the TV. You can also DIY a border surrounding your TV if you want to go with this route. If so, make sure to use quality wood that is highly resistant to wear and tear.
Also, use two bolts or wood screws to install the new flat screen TV securely into the DIY closet. The wall mount bolts and mounting screws allow passengers to binge watch TV without the device falling off of its compartment, even while the RV is on the road.
But take note that you will not be able to extend the device if you install these brackets. However, it does offer peace of mind to some RVers, especially those that are afraid that their RV TVs might fall from their mounts.
Conclusion
Did you enjoy this guide on how to install a flat screen TV in an RV? If you learned something from this article, feel free to share in the comments. Also, do not forget to share this with others who may need help in this regard.
In summary, make sure to use the right TV mount for your setup. Then, find the ideal location for the mount and TV in your RV.
Good luck, and remember to be patient. If the installation’s done correctly, you should be watching your favorite films and shows on your new TV in your camper or motorhome.

Hi, I am Tom Hank, an RV-er since 2014. Back then, I started without much help. As you can imagine, the struggles are endless. But now, you do not have to begin your adventures knowing next to nothing about RV lives.