
Your love for the outdoors brings you to many beautiful places while traveling with your RV. And, of course, if you like cooking, you probably wonder how to connect gas grill to RV.
The good news is, you definitely can do it, and the process is quite easy, safe, and fast. What you mainly need to start grilling your steak or burgers is an RV propane quick connect kit, with a detailed guide. Dig in!
Table of Contents
What Materials are Required to Connect a Gas Grill to Your RV?
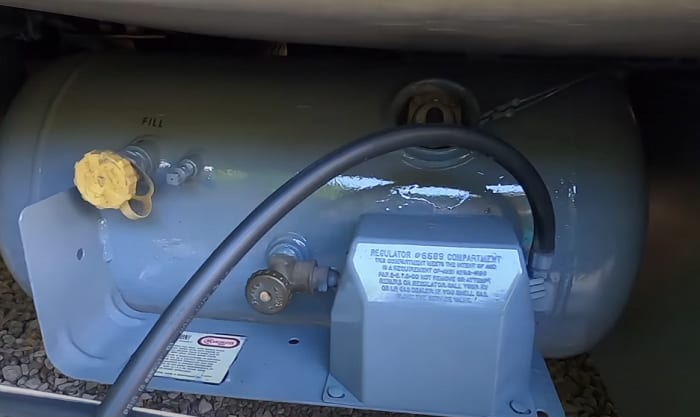
Most of the time, RVs already have propane regulators in place that are used to modify the gas pressure level when your RV is linked to a gas grill. The most common regulator for a family RV is a single-stage regulator, which we will explore in this post.
Here are the essential materials you need to get you started:
- External propane adapter kit
- Wrenches in varied sizes of 9/16, 3/8, and 7/16
- Two sizes of hose for a gas grill
- Gas leak detector spray
- A small box or cover
- Clean cloth
Got the tools? Let’s get cracking…
Steps of Connecting a Gas Grill to Your RV
There are new gas grills that come with an RV propane hookup diagram for easy installation. But if your grill has none of that, you never have to worry because we are here for you. Let’s check out the eight simple steps in connecting a gas grill to your RV.
Step 1: Clean up the propane regulator of your RV and make sure to eliminate all the rust. You can use 1/4 cup liquid soap and clean water to remove dust, dirt, and rust.
Note: Prior to cleaning, detach all connections between the tank, regulator, and hose. Once everything is dry, start connecting the right pieces.
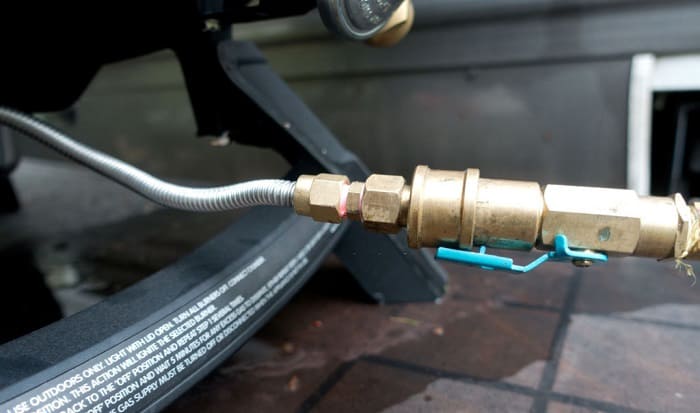
Step 2: Take the 3/8 and 7/16 wrench and use them to detach the valve from the regulator hose. Do not panic if you can smell gas while dismantling. The odor is normal, especially when the regulator has been used in the past.
Note: It is best to wear a face mask while doing this task, especially if you are prone to coughing. And keep bottled water with you since water can help you breathe easier when gas gets into your lungs.
Warning: For severe cases of gas inhalation, consult a doctor immediately.
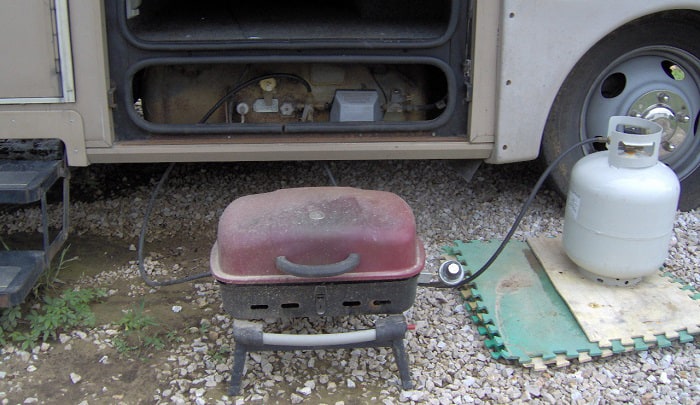
Step 3: Get the outer propane gas connector and link it to the recently vacated spot on the regulator. It is best to have the RV propane hose quick connect guide for a safer installation, but it’s totally fine if you don’t. Simply use a regular tool to assemble the valves and hoses.
Note: The propane regulator of the RV must be connected to the adapter’s right side, and the valve should be linked on the left side. At the top of the tool, fasten the gas grill. And the bottom side is used for the external propane.
Step 4: By now, you already know the right positions of the hoses. The next thing to do is find a box or something to cover the regulator for protection.
Step 5: Use the 7/16 and 9/16 wrench and check if the hoses are tightly or loosely connected. Always make sure to check to avoid gas leakage, which could lead to accidental fire or gas poisoning.
Step 6: Once you are absolutely sure that the regulator, valves, hoses, and gas grill are connected tightly without a possibility of leakage, then it is time to test your work. Spray a gas leak detector on the four sides of the adapter, and wait if bubbling happens. If you see bubble-like forms on the sides, then there is leakage, and you need to tighten the connection again. If everything looks good, then wipe off the solution with a clean cloth.
Step 7: Attach the movable propane tank to the short hose. And then utilize a 12 feet portion of the long hose to connect the upper part of the propane tank and the bottom portion into the gas grill.
Step 8: Double-check the whole assembly thoroughly. And if things look good, then start grilling.
Tips for a Safe RV Gas Grill Usage
This RV gas grill quick connect guidepost is intended to help you create a safe environment for your family while you camp in your favorite spot and cook your own food. To ensure a successful outdoor adventure with your RV gas grill, here are some tips that you can benefit from:
Tip #1: Turn off the gas grill when not in use. It does not matter if you grill again after 30 minutes. Turn your gas chamber off as soon as you are done. It would not take much effort to turn it back again later. So choose safety at all times.
Tip #2: Always double or even triple-check the propane tanks. If there is a time to be OC, then your gas grill connection is the perfect excuse. It is always better to be safe than to be sorry later.
Tip #3: Regularly clean the entire RV gas grill connection. Even if you put a box or cover on the regulator and four-sided connection, it is still imperative to clean the whole package to avoid rust, corrosion, or accumulation of dust.
Tip #4: Use the gas leak detector spray at least once a week. Make it a point to test the gas propane connection and see if there is any leakage. Even if you can see that the hoses are tightly connected, it is still ideal to use a leak detection spray.
Keep in mind that safety must always be your top priority. Your outdoor adventure with your loved ones can be filled with happy moments and fun activities, as long as no bad thing will happen due to your RV gas grill.
Conclusion
Now that you know the basics on how to connect gas grill to RV, you can start tinkering on your portable home. By directly connecting your gas grill to your RV, you can worry less about running out of propane. The propane tank of your RV can hold more propane compared to the portable bottles, so you can cook multiple dishes now without spoiling the fun.
Do you find this article helpful? If so, then please feel free to share this post. For sure, many RV owners would love to know how to connect a gas grill to an RV.

Hi, I am Joseph. Carpe diem! Seize the day! That’s always been my life motto. If you haven’t seen some of the most beautiful places in the country, you are missing out on incredible adventures.